I thought that it would be good to show a few clips that were filmed during the day and show you what happened behind the scenes! These few videos are short but show our planning throughout the day and a few decisions that we made.
Thursday, 21 February 2013

Wednesday, 20 February 2013
Filming Day 1
Just a short post to say that today we went to Weston Woods to start the filming of our film opening title sequence. It look us a little while to get there as we had to get two buses and walk up a giant hill, it was also very very cold but we got their in the end. The shots that we filmed today were the first 4 from our storyboard. I will include some examples of the shots that we had taken below.
The equipment we had to take to the woods with us was a tripod, a hand held digital camera, a GoPro camera and a voice recorder so we could record our footsteps whilst we were running. We also took all of our storyboards with us to keep track of what we were meant to be filming. I think that today was quite successful and we got lots of filming done!
Some examples of shots that we have filmed so far:
Filming Schedule
DATE
|
SHOT
|
LOCATION
|
EQUIPMENT
|
Wednesday 20th February
4.30pm
|
We will be filming shot 1,2,3,4 on this day. We will not be filming the rest of the shots as it will become too dark to film.
|
Weston Woods
|
Hand held camera
GoPro Camera
Tripod if needed.
Characters Costumes.
|
Friday 22nd February
4.30pm
|
On the Friday we will be filming the remaining shots. These are 5,6,7,8. We will have to make sure than we film at around the same time a Wednesday so that the lighting is the same.
|
Weston Woods.
|
Hand held camera
GoPro camera
Tripod if needed
Characters costumes
|
Sunday 24th February
12.00pm
|
On Sunday we will be recording the voiceovers so they are ready for when we start editing the footage together.
|
Josie’s House
|
Mac Computer using Final Cut Pro
|
The table above is the time schedule that my filming partner and I have agreed on. The dates and times need to be suitable for both of us so we decided on days that we can go to our location together straight after college and on the Sunday when both of us are free.
We had arranged dates and times previously over text and discussed this in more depth at college to decide on what shots that we are will be doing on certain days and what we are going to need. Evidence of these text message are below, I print screened them and uploaded them to my blog.

Friday, 8 February 2013
Props List
For my opening sequence I do not need many props as the main focus will be creating a scary atmosphere and using different camera shots to help create the atmosphere and help the audience relate to the emotions of the characters. However, we do need a few props and these will be simply the characters costumes, tripod and a head camera. The costumes the characters will be wearing will be a simple and casual day to day outfit consisting of plain tops, jeans, a jacket and plain Converse shoes.


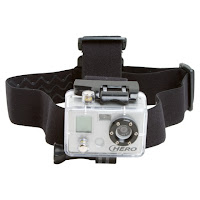 I think these costumes show the age of the girls well as they are teenagers and shows that the film is set in modern day (2013). We will use the tripod to film our long shots of the girls running through the woods and this prop will be useful because we can vary the hight of the tripod to show different angles of the characters, giving different emotions of vunrability and status. The head camera will be used to film shots which are coming from the girls point of view such as when they are running through the woods, looking around and behind them so show they are scared and uneasy.


 I think these costumes show the age of the girls well as they are teenagers and shows that the film is set in modern day (2013). We will use the tripod to film our long shots of the girls running through the woods and this prop will be useful because we can vary the hight of the tripod to show different angles of the characters, giving different emotions of vunrability and status. The head camera will be used to film shots which are coming from the girls point of view such as when they are running through the woods, looking around and behind them so show they are scared and uneasy.
Wednesday, 6 February 2013
Location Scout
 The location that I chose to film in is Weston Woods, this location is in Weston super Mare in Worlebury. This is the chosen location because it suits my storyboard as I wanted a location with lots of trees and bushes, and thought the best place in Weston is the woods! Another reason that this location has been chosen is because it is convenient to get to as I live in Weston and all I will have to to is get a bus to the woods, which is easy and will not cost me any money as I have my bus pass from college. I did not want to travel far because I will have to carry equipment with me and I do not want to risk ruining it or breaking it.
I like this location because it is very big so there will be plenty of places to film. I also like the fact that the floors have lots of leafs, sticks and stones and I wanted these things to be shown in the shots. Another reason I like this location is because I think it is a good place to set the scene of a horror film as it will be dark and it is a typical setting for horror films which is easily recognisable.
Title Sequence Ideas and Planning
Before I decide what shots will be in my film and what is going to happen, I need to decide and plan on thing such as the type of font, colours and where I want my titles to be, during the sequence or before. To get started, I am going to research and look at different fonts that relate and suit a horror film well. The fonts need to be relevant because it would be useless having girly, pretty writing as it would look strange on a title sequence for a horror film. To research different fonts, I went onto Dafont.com.
1.

2.

3.

4.

These are the four fonts that I thought were most appropriate to use on a horror film title sequence. I have decided to use two different fonts, one for the titles telling us the people who were involved in the creation of the film and a different font for the actual title of the film which will appear at the end of the title sequence.
For the titles which will be on screen throughout the sequence, I have chosen to use Example 4. This is because it is not as bold as the other fonts and I think it would look better and be easier to read and it isnt as chunky or bold. For the main title of the film, at the end of the sequence, I need a font which is bold and will grab attention. The font I have chosen for this is font example 1. This is because it is a strong, bold and rigid font and I think it stands out a lot. I also like the scratched detail filling the letters.
These fonts relate to what the film is about because they are simple, easy to read and they don't look 'gory'. By this I mean that they dont have blood dripping off them as this wouldnt suit a thriller film because it doesnt have any blood or gore in it. For a thriller film, you need simple fonts that stand out at the same time. I like font example 4 because it looks like it has been hand written and if you were to find handwriting in a thriller film it would normally scare the audience and create tension, which is the main objective.
I have decided to introduce my titles throughout my opening sequence as it is playing. They will be placed on the trees, on the floor and moving behind the characters as they are moving. This incorporates the titles in with the opening sequence which saves time and also makes it more interesting as I will be able to animate the titles more and it will add different shots into the sequence.
Storyboard and Shot List
Shot 1
This first shot in our title sequence is the establishing shot, this will be a Medium Long shot which will show the audience where our sequence is set and give a wide view of the woods. We chose to use a medium long shot because it introduces the setting to the audience well, it will also be a hand held shot to give the filming a documentary/home video effect. This shot will last for the first 1-10 seconds and the first voice over will be played throughout.

Shot 2
The second shot in our sequence is where our first title will be on screen. The title will on the tree as the two girls are running past. When the title appears on screen, the whole screen will freeze and go fuzzy for a few seconds. The type of shot we chose for this is a Medium Shot,this shot was chosen because as the two girls are running, they will be closer to the trees than in the first shot, but not close enough to be called a Close Up. This shot will last for the next 5 seconds, and these type of shots will be repeated throughout the sequence to allow screen time for the titles.

Shot 3
For the third shot, this is where the audience are introduced to Olivia. She will briefly appear on screen and as this happens a voice over of her thoughts will be played. The shot type chosen for this moment is a Medium Long Shot, this will allow enough space on the screen to be able to see the majority of her body. Another title will appear in this shot behind Olivia and move with her as she runs as if it is following her. This shot will be on screen for 5 seconds.

Shot 4
The fourth shot will be a Medium Close Up and the camera will face down to the floor, as if the camera was looking through their eyes. This is where another title will be on screen, it will place on the floor of the woods, the screen will freeze and go fuzzy. After a few seconds the screen will unfreeze and start moving again and the whole shot will last around 5 seconds.

Shot 5
The fifth shot of the sequence will be a Close Up and will be filming their feet as they carry on running. The title will be behind them following their feet and this will continue until the character has gone out of the screen. Behind them we will be able to see lots of sticks, mud and stones on the floor and trees in the background. Again, this shot will last for 5 seconds.

Shot 6
The sixth shot of our sequence will be a High Angle, establishing shot. In this shot, the two girls will be running together through the woods and we will be able to see them looking behind and all around them showing that they are scared. This shot will include Match on Action as we will see them running from the side but will also go back to seeing through their eyes, so they will need to match and look like it happened continuously otherwise it will not play smoothly and will be jumpy. When we see the two girls running together through the woods, another title will be on screen following them.

Shot 7
Shot seven will be where Amelie will be pulled to the floor and get dragged backwards along the floor. For this we will need to use a Low Angle Medium Shot and to show her being dragged along the floor, the camera will move backwards. This shot will also be on screen for 5 seconds. At the very end of this shot, a screaming sound will start and carry on into the next shot.

Shot 8
Shot eight of our title sequence will be where the title of our film will appear on screen. This will be a Medium Shot and when the title appears on the screen it will be very sudden and quick. In this shot the music will stop, we will just be able to hear the screaming and this will slowly fade out as it will be the ending of the sequence. In the background of this shot, it will be a dark shot of the woods and the title will be projected onto the trees in our chosen font.

This first shot in our title sequence is the establishing shot, this will be a Medium Long shot which will show the audience where our sequence is set and give a wide view of the woods. We chose to use a medium long shot because it introduces the setting to the audience well, it will also be a hand held shot to give the filming a documentary/home video effect. This shot will last for the first 1-10 seconds and the first voice over will be played throughout.

Shot 2
The second shot in our sequence is where our first title will be on screen. The title will on the tree as the two girls are running past. When the title appears on screen, the whole screen will freeze and go fuzzy for a few seconds. The type of shot we chose for this is a Medium Shot,this shot was chosen because as the two girls are running, they will be closer to the trees than in the first shot, but not close enough to be called a Close Up. This shot will last for the next 5 seconds, and these type of shots will be repeated throughout the sequence to allow screen time for the titles.

Shot 3
For the third shot, this is where the audience are introduced to Olivia. She will briefly appear on screen and as this happens a voice over of her thoughts will be played. The shot type chosen for this moment is a Medium Long Shot, this will allow enough space on the screen to be able to see the majority of her body. Another title will appear in this shot behind Olivia and move with her as she runs as if it is following her. This shot will be on screen for 5 seconds.

Shot 4
The fourth shot will be a Medium Close Up and the camera will face down to the floor, as if the camera was looking through their eyes. This is where another title will be on screen, it will place on the floor of the woods, the screen will freeze and go fuzzy. After a few seconds the screen will unfreeze and start moving again and the whole shot will last around 5 seconds.

Shot 5
The fifth shot of the sequence will be a Close Up and will be filming their feet as they carry on running. The title will be behind them following their feet and this will continue until the character has gone out of the screen. Behind them we will be able to see lots of sticks, mud and stones on the floor and trees in the background. Again, this shot will last for 5 seconds.

Shot 6
The sixth shot of our sequence will be a High Angle, establishing shot. In this shot, the two girls will be running together through the woods and we will be able to see them looking behind and all around them showing that they are scared. This shot will include Match on Action as we will see them running from the side but will also go back to seeing through their eyes, so they will need to match and look like it happened continuously otherwise it will not play smoothly and will be jumpy. When we see the two girls running together through the woods, another title will be on screen following them.

Shot 7
Shot seven will be where Amelie will be pulled to the floor and get dragged backwards along the floor. For this we will need to use a Low Angle Medium Shot and to show her being dragged along the floor, the camera will move backwards. This shot will also be on screen for 5 seconds. At the very end of this shot, a screaming sound will start and carry on into the next shot.

Shot 8
Shot eight of our title sequence will be where the title of our film will appear on screen. This will be a Medium Shot and when the title appears on the screen it will be very sudden and quick. In this shot the music will stop, we will just be able to hear the screaming and this will slowly fade out as it will be the ending of the sequence. In the background of this shot, it will be a dark shot of the woods and the title will be projected onto the trees in our chosen font.

Subscribe to:
Posts (Atom)